Thursday 24 December 2020

Day 12 Plus

 Day Twelve Plus

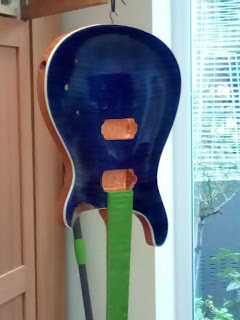
Following some advice I received on an internet group of guitar builders, I’ve given the body – front, back and sides – three thorough buffings with Meguiar’s compound and the difference is stunning, even if I say so myself. Although the top still has the surface texture of the flame element of the veneer and the sides and back (especially) retain the grain of the mahogany, nevertheless the gloss is quite mirror-like. Although it’s clearly not professional I think I’ve about exhausted the limits of my ability and it’s time to start adding the hardware and electronics. 


Today had to be a 'plus' because when I came to fit the machine heads (tuning gears) I discovered one of them didn't have a hole in the shaft in which to insert the string. Almost in disbelief, I contacted the kit supplier and, once again, they stepped up to save the situation. By overnight courier, they delivered a new set of machine heads so that I could do the basic completion of the guitar in time to make a sort of presentation to my grandson for Christmas. I use that term because his present is actually a ukulele on which to have his first lessons since, at 5, his fingers don't extend to any sensible guitar. The home build is a goal for him to achieve.

Although I detect a small change in the neck/body joint the guitar has fulfilled most of my hopes by not folding into an unwanted 'travel guitar'. I used the supplied strings which, although they're unbranded and unpackaged, seem to be very lightweight and are quite adequate for the present purpose.

The instrument seems to be quite playable with a very straight fretboard and a very fast action. That aspect pleases me greatly. I'm somewhat less enthusiastic about the pickups but I've only had a few minutes playing through the amplifier to make sure that they both work and some post-Christmas fettling will probably improve things.


Would I do it again? Yes, in fact, I've ordered a short-scale bass guitar kit for delivery in the New Year. I'd have preferred an ash-bodied kit but they're no longer available so mahogany will have to do.


Would I use UK Music Supplies and their Coban brand? Again yes. The quality of the wood, especially the neck and the fretboard are the clincher, that and the company's attitude to its customers. As far as that's concerned I can do no better than repeat her an entry in my main blog which sums up my whole experience.

One of life's truths is that we all make mistakes. Happily, most of them are insignificant or can be corrected but even then, there are degrees of errors. At their heart, they're all human failings but even so when the person is acting for a company it's the company's reputation that invariably suffers. Since the ability or even propensity to make mistakes is universal, it's not practical or realistic to simply stop using or supporting the company that's dropped a clanger. Instead, I've come to apply another measure; how does the business react when they've made a mistake?

I've recently encountered two instances (both on e-Bay) in which the individual responsible for the mistake completely failed to act properly. As a result, their reputation and standing have suffered and in one case they were financially penalised by the portal as well.

In contrast, a company from which I bought a kit from which to build an electric guitar (a Christmas present I was allowed to start before the actual day as a lockdown therapy). In total, the company has made three mistakes yet, even as I write, the manner in which the company – really the people working for the company – has responded has not led me to rule out buying from them again.

Initially, the kit was supplied with a one-piece bridge/tail unit suitable for another style of guitar. The cavity in the body has to match the design of the unit so it was simply not possible to use the wrong part. I sent the incorrect parts back at once and the company despatched the correct bridge and stoptail parts. Unfortunately due to the prevailing season and national state of health, these didn't arrive so I complained. The company responded by sending another set of bits. Coincidentally the two consignments (sent at different service speeds although the slower was also further delayed en route) arrived in the same post.

However, when I came to assemble the hardware elements of the guitar I discovered that although I'd counted the number of tuning devices supplied – one for each of the six strings – I'd failed to notice that one had no hole through which the string could be pushed to fasten to the tuning head. Not only is this unusual – the company entirely plausibly claimed it to be the first time such an error had occurred – but it makes one wonder how such a mistake could even occur.

The guitar might have been a Christmas present which would have been spoilt by the error but the action of the supplier – sending a replacement part by overnight carrier – has left me as satisfied with the company as I would have been had the errors never occurred.

In other words, my measure of the company as a supplier isn't reflected in the quality of its product but by the way it has handled its mistakes. Have I always felt this way? Probably not. More relevantly, did others treat me like that when I made my mistakes? I hope so.


Sunday 20 December 2020

Day Eleven

The last topcoat (the third) has been applied to the front of the body and the front of the headstock only. When yesterday’s topcoat on the headstock was adequately dry, I wrote my signature on the headstock, eliminating any suggestion that the guitar was a throw-out from a Maryland factory! I used an ultra-thin nib Posca pen. By this morning the writing was dry and firm and when I gave the headstock and the end grain of the scoop cutout a final topcoat there was no smearing or spreading of the signature.


Finally, I have given a coat of the same ‘stronger’ dilution to the front of the body and, for the first time, dried it initially lying flat. This eliminated any possibility of a stray run and has left the surface as close to a high gloss finish as I was going to get with varnish on the unfilled flamed-maple veneer top.


However, that’s not going to be the end of work on the body. I discovered I had some Meguiar’s and T-cut rubbing compounds and bought a pack of three buffing wheels for my drill. Once today’s coatings have thoroughly dried I’m going to buff and polish the body to maximise the gloss and, with luck, even get a bit of a wet-look about it. 


Saturday 19 December 2020

Day Ten

 Before I started the final rubdown I took the opportunity to feel the neck as the player would. Whilst it’s true that although the previous (and last) thin coat had been 24 hours earlier, at once I felt the sensation a number of builders have noted, of not having direct contact with the wood of the neck. I decided to leave the neck as it was, namely with just half a dozen coats of the thinnest poly mixture.

Since it is still my intention to ‘sign’ the headstock before the final topcoat, I applied the 4:1 ‘strong’ mixture of poly and white spirit to the face of the headstock only. I let that dry a little to be sure of the gloss look before applying the same mixture to the front, sides and back of the guitar body.


The result is very satisfactory. I’m resigned now to the fact that the body won’t have the glassy gloss typical of PRS professional guitars but will nevertheless be a decent amateur attempt.

Unfortunately, the replacement bridge and stoptail have yet to arrive from the UK importers, but that’s partly due to Royal Mail apparently losing a bag of outgoing mail from the company, partly due to the seasonal pressure on the Post Office and partly, I’m sorry to say
because the company waited until I’d returned the incorrect bridge they’d initially supplied before they despatched the correct items. When it’s the company’s fault, a little trust and immediate despatch of the correct parts would have been a nice gesture.

If there’s any silver lining to this particular cloud it is that my impatience to get to the ‘interesting’ stages of the build – sanding and waiting for gloss to dry are not ‘interesting’ – are effectively restricted.

Thursday 17 December 2020

Days Eight and Nine

These are days when patience pays off. Resisting the urge to apply too much thin gloss at one go or to apply the next coat before the previous one has properly dried is difficult if you’re anxious to see the instrument finished but I’m told the wait is worth it.


In addition, I felt some remedial work was necessary on the treble side of the top near the neck joint and that’s going to need some additional time. The cause was a small over-application of thin gloss and needed a stronger rub-down. I think it may not be entirely right until the first of the topcoats is applied.

In addition, I’ve decided to sign the headstock much in the style that the owner of PRS guitars uses his signature. After some experimentation, I bought a fine-pointed white Posca pen that, when properly dried, seems will not smear or be affected by the gloss. By its nature, the script will not need much protection so I intend to leave the signing until the penultimate topcoat of glass is dried and cover it only with the final topcoat.

Tuesday 15 December 2020

Day Seven


Since I’d made up a decent quantity of thin polyurethane gloss, I decided it would keep, at least for the period of the build. That meant there was plenty ready for the next thin gloss coat. 


Technically, because of my mistake on Day Six, the front of the guitar has one fewer proper coats of thin gloss but I’ve decided to continue applying the thin layers to the whole of the instrument in each coat. If I feel the front looks distinctly different to the back after the thin coats I’ll either give the front alone an extra coat od the thin mixture or maybe step up the polyurethane in the mix before giving the final coats at ‘full’ 4:1 gloss. 

Saturday 12 December 2020

Day Six

First big mistake - I forgot to oil the front of the guitar before applying the first very thin layer of diluted polyurethane gloss. The result was that the front remained dull unlike the back, sides and neck that all looked as though they’d had the first thin layer of gloss.

Is this the solution? Who knows. I searched the internet, found no relevant answers but decided that one thin application of 80% white spirit was something I’d have to live with. Given the thinness of the veneer rubbing it back to raw wood wasn’t an option so I decided to ‘pretend’ I’d not made the mistake.

I rubbed the front lightly with 1200 grit wet and dry then applied two coats of penetrating guitar oil. After just two coats with a couple of hours drying between coats the body looked much better as in the first photo. 


After five coats, (bottom photo) I was satisfied I could do no more to rectify my mistake so I put the guitar to bed and resolved to renew my thin layers of glossing tomorrow.


Friday 11 December 2020

Day Five

 Ever since I decided to build a guitar with a set-in neck I realised the moment when the clamps were removed would be something of a test of my woodworking inexperience. In the event, once the neck and body remained firmly joined together it was almost a let-down. Of course, I’d told myself that the bodies of violins to double basses have been glued to their necks for centuries but the satisfaction at realising that I’d done the job in my kitchen was a moment of satisfaction.


Clearly, I’d probably applied too much pressure through the clamps since the outline of the woodblock protecting the back of the body had become imprinted in the mahogany. The woodblock was an oak offcut left after our kitchen was extended a couple of years back; maybe a softer wood would be better next time. In the event, some determined sanding solved the problem. That has delayed the build by a day since the latest sanding needed another coat of penetrating guitar oil.


That left time to mask up the fretboard with painter’s tape and to line the sockets for the pickups and the controls with copper tape. Now it’s just a matter of patience.


Thursday 10 December 2020

Day Four


Although some of the American YouTube videos demonstrate how to support the neck joint during glueing using folded paper wedged between the G-clamps and the fretboard and back of the guitar, I thought that was somewhat slipshod. It seemed logical to me to protect the newly-dressed fretboard and carefully rubbed-down body with more than a few folds of Xerox copier and emulated the idea shown in one of Coban’s videos and made a pressure board with slots for the frets. This meant the pressure bore directly and solely on the ebony not on to the fretwire. Protecting the back with a flat piece from the same offcut was simple.


I planned to use some Gorilla brand wood glue I had on the shelf but it was rather solid and heavy. Rather than spoil the job for £4 worth of fresh glue, I added a few pounds more to the overall budget. I checked the joint without glue to decide where best to position the two g-clamps. It’s a job that ideally needs three hands but since the good lady of the house was not available I managed with just my two. My sense is that there’ll be a small clean-up job when the clamps are removed but, no big problem.


I was pleased when the luthier complimented me on the smoothness of the neck but the real test will come when we can check the fitting with strings. I plan to let the parts supported under pressure settle firmly before disturbing the joint sometime late tomorrow. 

Wednesday 9 December 2020

Day Three

Before I start the poly coating process I’ve decided to have the fretboard levelled and dressed professionally. On my kit, it’s the single most necessary job to be done and the one that really does need both specialised tools and skill. I’ve been quoted £40 by the luthier at PMT in Manchester for a job he’ll complete in about an hour. Unfortunately due to the present health restrictions, I can’t watch him but even so, the charge compares very favourably with the cost of the tools for me to do the job myself, even if I ignore the company that rather arrogantly places itself and its equipment higher than all the other UK suppliers

The other detail I’ve discovered applies to this particular kit. That’s the very attractive deep scoop on the treble cutaway, a feature of PRS guitars. With Coban’s veneer top it’s difficult to mask the scoop to avoid getting the stain one uses on the veneer from the scoop – assuming one is going to treat the scoop in the same way as the back and sides – in my case as unstained wood. If I make another instrument with this design I’ll avoid a veneered top and treat the top, scoop, sides and back in the same fashion. I think it’s going to end up as a fine-pointed paint-brush job along the edge of the veneer.


Monday 7 December 2020

Day Two

One of the themes running through the YouTube videos concerned with building a kit guitar is a mantra that seems to say ‘guitar necks should be as natural and untreated (ie unvarnished) as possible’. Yet when I look at my professional modern guitars, Gretsch and Gibson, at my grandson’s Epiphone, they all appear to have the same glossy finish on the neck as well as the body. I can understand it might be ideal to have only a light coating of polyurethane but at the end of the day, most professional makers seem to put durability above ‘feel’ or ‘sensation’.

So, today I purchased a tin of glossy polyurethane varnish and a large supply of white spirit intending to emulate a private maker whose guitar simply dazzles in his YouTube video - much as the genuine PRS guitars mine is based upon shine.

The man whose advice I’m taking gave his instrument five or six coats of very dilute varnish – he estimated a 4 to 1 mixture, each coat allowed to dry for 24 hours and rubbed down with 600 grit wet and dry before the next. Finally, he gave it two coats of a stronger mixture of the same ratio but with the ingredients reversed, ie 4 parts varnish, 1 part white spirit.


Day One

The first job is the preparation of the neck and the body. I bought four packs of wet and dry from Tool Station each containing 10 sheets in 180, 400, 600 and 1200 grit. I already had a sanding block so the total cost there was about £10. Four hours later I was happy that I’d smoothed the body and the neck to a more than adequate finish. There’s no rocket science involved, just elbow grease. By the occasional use of a damp cloth to raise the grain, the dust raised was minimal and earned no hostile comment from my wife. I used the small veneer off-cut (a bonus included by UK Music Supplies with kits sold directly) to test the stain but, as I'll explain in a moment, ultimately I was sorry I’d bothered with the black. Multiple coats of the blue would have created the effect I wanted and I’d have saved £5.


One thing I did copy from the videos was to insert a short-shanked screw hook in the place where the bottom strap button will go. When you come to staining and other body treatments it’s a great help. On the same subject, I took careful note of a comment by the luthier with the unusual skull tattoos who recommended very long screws for the strap buttons; evidently, he’s seen more than a few accidents caused by buttons coming loose on stage.

Another purchase I’d strongly recommend is some painter’s masking tape (£5 from Screwfix). Masking off places like the distinctive shoulder carving of the PRS model is vital.

In the end, I gave the veneered front of the body eight coats of stain. Many of the first were diluted and rubbed back when dry, but later ones were full strength.

I’d decided to use the Penetrating Guitar Oil on the sides and back of the body and the neck and headstock. I gave the parts two coats and rubbed down with 600 and 1200 grit paper when each was dry and rested overnight. 


One final point. During the sanding of the neck I must have nudged the nut which fell off. A YouTube video I watched showed a guitar tech fixing a nut back on a guitar. He used just a small blob of super glue to hold the nut in position then restrung the guitar. This allowed the pressure of the strings to fasten the nut in position.

The reason he used just a small amount of super glue was to avoid damaging the neck or fretboard if a subsequent repair needed the nut removal.

My purchase


Anyway, let’s get to my own purchase. I bought a PRS-style guitar. The carrier had managed to punch two holes in the box that reached right through to the contents; fortunately, they were undamaged but more care with the packaging wouldn’t go amiss.


Because I’d commented on the ill-fitting of a Coban neck and body demonstrated on one of their videos, UK Music Supplies offered to check the fitting of the instrument they were sending me – another benefit. The rest of the supplied kit was correct. Other companies are very sniffy about the ‘standard Chinese-quality machine heads’ supplied in less-expensive kits. I’m not qualified to comment but the units are sealed, feel as though they’re at least adequately lubricated and, let’s face it, the gearing is one of the most basic known to engineering. I sense there’s more than a little ‘brand-awareness’ arrogance going on here.


The biggest potential drawback of a cheap kit is excess glue, especially on any veneered surface. The glue won’t take the tints or other treatments applied to the surface but can’t be seen until the first coat is applied. The grandson who would like to own the instrument I’m building expressed a wish for a blue guitar and so I bought bottles of Royal Blue and Black stain from the best-advertised guitar stain company. The company's video claims the black will bring out the effect of the flame effect in the veneer, blue will provide the main colour of the front of the guitar body. On the evidence of my instrument, I disagree. 

The back of the body and neck will be in uncoloured wood. Along with a 150ml can of oil for the neck from one of the most expensive luthier companies, including an extortionate £6 for delivery of a modest Jiffy bag the cost was about £20. 

If I'm tempted to make another guitar, I will follow the advice of another video and use bulk supplies of inkjet printing ink. Quite obviously it does as good a job as the expensive stain.  

Other choices and considerations

The Coban kit’s instructions consist of two densely typed pages of A4 and a wiring picture, not an electrical diagram. The paucity of instructions is readily acknowledged by the company and the buyer is urged to explore and learn from the many kit guitar building websites and YouTube videos. Hmm. That’s my reaction based on more than 30 years experience of making television and video programmes. 

Like the majority of YouTube videos, most of those about building guitars are not professionally made. There’s rarely any evidence of a script. Production values are virtually nil. In more than one video the demonstration stops and is replaced by a title apologising that the camera battery ran out before the critical stage was recorded. The sound levels are very variable, a characteristic often made worse by unnecessary and unnecessarily loud guitar music. The images are often out of focus and editing is rarely polished. All of this means the videos are sometimes hard work to watch. More than once my heart sank when I saw that a video lasted more than 60 minutes and still only covered a small part of the guitar-building process.

Ironically it’s not just the home-grown videos that are low on production values. One of the best-known kit guitar company’s videos is fronted by a luthier who evidently believes he is a stand-up comedian. You can tell he’s a luthier because, like all those claiming to be qualified, he stands in front of the world’s supply of tools. Luthier he may be; comedian he’s not. Sadly his attempt at humour is rambling and laboured which only reduces the value of his videos even more.

So what help is the internet?

Frankly not much. For a start it's inconsistent. For example, Coban recommends preparation of the guitar body with up to 2000 grit wet and dry; the famous luthiering company with its putative comic recommends a maximum of only 240 grit. Take your pick, they can't both be right. 

For every YouTube video recommending an oil, urethane or water-based treatment for the wood there’s another declaring that product to be useless. Add to that, big differences in the market; for example, Tru Oil is a staple of the gun-owning fraternity in the USA who use it to maintain the wooden stocks of their guns. In the UK it’s as difficult to locate as the guns it’s made for. Other treatments require annual or bi-annual work to maintain their looks and efficiency – hardly practical for a youngster’s instrument. 

On my evidence, the quality of the management of the companies in the market is very variable. My guitar was supplied with holes drilled for an Adjustomatic-type bridge and a stop tailpiece. Yet the hardware supplied was a Stratocaster-type, combined bridge and tailpiece and a tremolo unit accessed from the back of the guitar. 

In fairness, another measure of the quality of a company’s management is the manner and urgency with which they endeavour to correct mistakes. On that basis, UK Music Suppliers/Coban can’t be faulted. I reported the flawed packaging on a Saturday, the replacement hardware was despatched at once.

Finally, before getting down the actual build, the one element that needs serious attention by the builder is the fretboard. To say the frets need attention is an understatement. The frets shredded the wet and dry I used to smooth the neck and some of the frets are clearly lower than the others. The solution isn't one of ability or experience though clearly fret dressing requires the proper gear. I've always held that cheap tools are a poor investment but even middle-range luthier kit isn't cheap. It's specialist equipment and has to be regarded as an investment.

The trouble is if you're only envisaging building one or two guitars, you'll never see a return on that investment. The solution is to pay a luthier to do the work for you - a suggestion that's easier to write than to achieve during lockdown but which is obviously the solution. Happily, it doesn't prevent you from getting on with other parts of the build.


First things first...

I chose to make a kit principally because I don't have the woodworking skills to start from scratch nor do I have the equipment that's necessary to commence with a block of wood.

I selected the kit to buy and build quite carefully. I decided to build a sold guitar, partly because it demands fewer woodworking skills than a hollow-bodied instrument or an acoustic model. I also learnt that some forms of rosewood can cause irritation if inhaled and although I’m fairly fit for my age I didn’t want to risk my health. That's why I chose a guitar with a mahogany body and neck with a thin veneer of maple glued to the top of the body.

Avoiding the potentially 'harmful' timber meant the very least expensive kits were out of contention. The fact that my budget was limited also ruled out the more expensive and better-known ‘name’ brands. In any case, the last category of kits are not only very expensive but they’re not even complete kits which meant my inexperience might end up costing me much more than my budget would allow. Another factor was that I’d written to one of the ‘posh’ companies, well-known for their luthier's supplies, asking about their in-house week-long courses but they didn’t even bother to reply.

Ultimately I chose a Coban brand kit, imported from China by UK Music Supplies in Norfolk. They’re also available on Amazon but the direct price is a few pounds less and you get a little more for your money.

Why build your own guitar?

 I’ve been playing the guitar for over sixty years. If that sounds like a boast it’s not for I’m still nowhere as accomplished as anyone ought to be after all that time. The first guitar I ever tried to play was a home build so that at least, is one reason to be building a kit guitar now after all those years.

In fact, my principal motivation to build a guitar has little to do with my own playing but much more to do with the fact that two years ago my third-oldest grandchild asked me to teach him and now his younger brother wants to learn as well. 

So as you can properly understand and maybe empathise with me, I’m not a teacher nor have I ever had a single guitar or music lesson myself. Nor am I an experienced carpenter, joiner, or even a keen DIYer. I don’t have a man-cave, a carpentry shed or even a garage. All my work was done in our kitchen/living room.

All of which I hope encourages you to find that someone perhaps quite like you has tried to build a guitar and enjoyed the experience.

Day 12 Plus

 Day Twelve Plus Following some advice I received on an internet group of guitar builders, I’ve given the body – front, back and sides – thr...